Garrattfan's Modelrailroading Pages
MDC 3tr Shay
Decals
March 11, 2006
Applying decals to your model has many secrets and it needs some practice and some knowledge to do it right but actually all it takes is a lot of patience and the rest is easy.
First I coated my entire model with a transparent gloss coat. You might not want your own model to be as shiny as this. But decals settle on a flat, smooth surface without trapping air underneath. That makes the decal virtually invisible. If you apply decals on a dull surface there is probably going to be a greyish gloom over the decals. I want to avoid that. So the steps are:
- gloss coat the model
- apply decal with water
- allow to dry
- let the decal settle with a softener
- allow to dry
- repeat step 4 and 5 if necessary
- fix the decal
- allow to dry
- coat the model with a coat of your taste (gloss, semi gloss or dull)

All the basic tooling you need to decal your model
You need: a knife, some water (right), a small brush, and an old micro spatula I had left over from my chemistry background. You may use anything else if you want to as long as it not sharp. Decals are delicate so manipulating them with a cutting blade is usually not a good idea.
 |
 |
||
Lifting the decal Here you
see the micro spatula in action, holding up the first stripe. As you can
see (excuse for the blurred image) the edges of the spatula are rounded
so you can gently manipulate the decal |
Positioning with a brush After putting the decal roughly in place
you carefully push it into position with a soft, wet brush. You can use
the brush to add water or, if you first dry the brush, remove water as needed.
More water means more movement, less water means less movement. Long decals
can be hard to move longitudinal. In that case pick the decal up at one
end with the brush and try to move it by pulling gently . |
||
 |
 |
||
Dry When the decal is correctly placed
suck away superfluous water. Do this cautiously because even the flow
of this tiny bit of water can move it out of place. Keep checking! |
Soften When the decal is dry, apply a decal softener. I use MicroSol from Microscale. It lets de the decal snuggle over any irregular details like rivets. I usually apply it twice. |
||
 |
 |
||
Striping on the drivers cab |
Applying the number. No 1 because
it is my first kit I'm going to finish. Here you can clearly see how the
spatula and the brush work together to manipulate the tiny and fragile decal.
To give you an idea: the 1 is 3,5 mm high, the spatula
5 mm wide |
||
 |
 |
||
I have a number so I exist!! |
Trick To work more easily on the the drivers cab I
screwed the cab/boiler assembly to the frame. The cab/boiler assembly alone
easily rolls over. |
||
 |
|||
Setting Then after everything has dried a setting solution is applied once or twice. I use Micro Set from Microscale. |

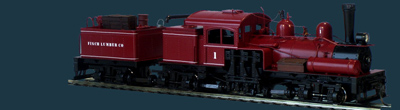
Here is the complete right side. The road name is still to come.

Sign my
GuestBook